


I see a lot of people adjust Shift Levers incorrectly for the 915 transmission, and I think it is because it is just too sensitive, and not obvious how it needs to be adjusted. This is even more an issue with shift kits because the adjustment is even more sensitive. I will try to explain, but it may be difficult to follow me.
If there is no center console, the boot will come off easy so pull the boot up off the Shift Lever so you can see what is happening. Do not bother if there is a center console, it makes putting the boot back in place very difficult, and frankly it is not necessary to make the adjustment. This exploded view , and the other various photos in this article should allow you to see how the linkage goes together.
Start by removing the shift cover plate in the back seat. It is under the carpet on the tunnel behind the seat belt receptacles.
Before you make the adjustments confirm the front Ball Cup bushing, shift rod Slide Ring
bushing, and coupler bushings are not braking up or gone completely. It is easy to feel a
problem with any of these when you have years of hands on experience. While sitting in the
drivers seat, grab the shift coupler with your right hand and hold it firmly while moving
the Shift lever gently with your left hand. You should not feel very much delay in action
at the coupler when moving the shift lever. This delay, or as some call it play, is
caused by a missing or broken Ball cup or slide ring. Another possibility of play here
could be a loose set screw in the ball cup socket. This allen screw secures the ball cup
steel socket onto the main shift shaft. And yet another possible cause of play is the small
machined steel spud in the end of the main shift shaft. It is spot welded in place, and
some times the spot weld can break and cause excess side play in the shift lever. Usually
this can be fixed by welding. It is a bit tricky as the weld often interferes with the cup
going on. It is pretty rare to see the
shaft so badly damaged it needs replacing
Next make sure the rear Coupler bushings are not deteriorated. Just take a close look
with a flashlight. Replace the front Ball cup, slide ring, and the rear coupler as needed.
Some people replace the bushings in the coupler with 914 bushings, or after market bushings,
but I do not recommend that as it transmits a lot of vibration into the shift lever. The
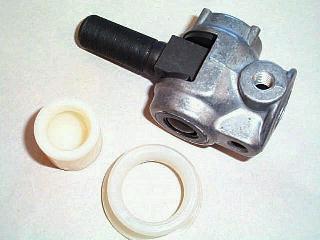
below picture, clockwise from left, is a new Ball cup, updated Coupler, and Slide ring.
The concept:
The adjustment is made by loosening the clamping bolt at the rear coupler slightly. You want
to have the Shift Levers vertical tube precisely vertical as
viewed from the side
When the Shift Lever is in 1st or 3rd the sideways play on both must be the same. This
requires a sensitive touch, so just your finger tips.
The sequence:
This depending on the coupler installed, most likely yours is original. The differences are
how the steel section is machined to create friction inside the main shift rod, under the
clamp. The original has very fine grooves like splines, and the newer replacement couplers
have circular grooves like threads. The direction of the grooves effects how easily it is to
move the Shift Lever in a particular direction. If yours is original, You would make the side
ways adjustment first then snug clamp a bit and it should hold while making the forward back
adjustment. When the coupler is the original spline style this can be pretty tricky to do.
The new style couplers make this step a lot easier.
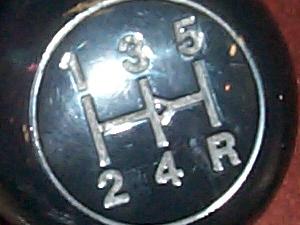
Once it is working correctly, you should be able to move the Shift Lever into the 5th-Rev column without touching either of the two vertical gates. Test by removing the slight play forward or backwards prior to moving to right to test for interference. It should not touch either when moving to the right. The next thing to test is the Reverse lockout dog. Shift into 5th gear, and confirm that the little spring lockout dog springs back to its relaxed position. You should not have to push forward more then normal for this to occur. If it does not spring back, you can hit Rev gear when shifting from 5th. You may need to make a very small adjustment forward to get it to work. Do not go too far or it may disrupt other functions, and may also allow you to hit Reverse coming out of 5th. If for some reason the reverse lockout doesn't seem to be working, the reverse lockout gate could be broken.
Test drive the car paying close attention to how it goes into and comes out of 5th. The last step is to make sure you can not even force it to hit Reverse coming out of 5th. BE CAREFUL, slowly and gently shift from 5th while pushing to the right and pulling back. If the adjustment is correct, and the lockout dog is working right, it will not touch.
After market Shift Lever kits are not the best engineered products, but Porsche does have an excellent shift kit available. The kit 911.424.931.00 is a set of parts to convert a standard 915 shifter to the M241 option. The M241 option, 'Shorter shifting travel' was made available around 1985, and is very common in the 86 Carrara. If you have problems I would suggest you get one of those.
Good luck