

I will attempt to inform all of you on what it takes to do a complete service on a 1984 to 1989 Carrera. You may be surprised in the fact that there is more to it then meets the eye. I hope you'll enjoy the read.
First things first; "Talking to the customer" This is a very important step in the service. Why? You ask. When you talk to the customer about their car, you will be asking; "for their contact information, ie. phone #s, email...etc."(We use this information to get a hold of them for informing them the status of their car, to authorize additional work to be done, to email them photos of a specific area of the car that may need attention. This saves you..."the customer" from having to make a trip to the shop to see what needs to be authorized. This is an especially useful tool at RMG Enterprises "are there any abnormal noises that we need to be aware of?", "we will need to have the wheel lock keys to remove the wheels for brake bleeding or access to valve cover areas on most models", "how do we dis-arm your alarm system during the service?" (It can get very stressful for the mechanic to have the alarm setting and going off on it's own every time the car is bumped or jostled) One of the most important things in communicating with the customer is for the service writer to accurately translate the customers needs onto a work order! (Everyone knows that the "Service writer" in most cases, is NOT the one doing the work on the car. It's the "Technician" who needs to know the details)
Enter the Technician The first thing we are going to do as your Technician is to look carefully at the work order and see what needs to be done to the car. And communicate with the Service writer if there is a question.
Technician commenced Next a quick walk around the car to see if anything is obviously not normal that the customer may have forgotten to mention. ie. A wheel lock cover cap missing, a lens cracked or broken, windshield condition, wiper blade condition, door dings (yes we look at that too), overall outside condition of the car ...etc.Inside the car now This is the part where we check all your switches, knobs, a/c, heater blowers, interior lights, gauge lights, windshield squirters, cigarette lighter socket, sunroof operation, and do an external light check. (oh yeah, we cannot forget "the pedal pad and keylight condition". The keylight is very important! When it comes time to pay the bill, you will be mesmerized by the gentle swinging light that is now working and swinging in front of you by the smiling Service writer whom greeted you earlier. The whole time this and exterior check outs are being done, the Technician is making notes on the back of the repair order. Two reasons for this; first is to inform the customer of any additional work that needs attention, and second, to keep a record for the future for us. Record keeping is important not only for us as "The Real Mean Garage", but for you in case you lose your records we'll have a copy for you.
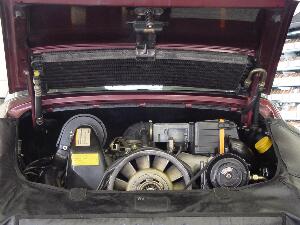
Racking the car This is a time where the car is now inside the shop. At this time the Technician is still making mental and written notes on the vehicle. How did the car start up?, Did it idle smoothly after start up?, Did it smoke, die, chatter when the clutch was let out...etc. At this time we also get a second look at the outside of the car in a different type of light. Under fluorescent lighting sometimes things show up better then in direct sunlight. The front trunk and rear deck lid are popped open now. Usually the Technician will have the car lifted to waist level at this point and begin fixing any exterior lights that are burned out. (Checking the fuses first is always a good thing) While in the front trunk we will be performing a "Microvat" test of your battery and it's condition. Once the battery and lights are checked, and functioning, we move to the business end of the car. (the engine compartment) The first thing that happens is a "fender cover is installed". (we don't want to scratch your car) Here we will be making notes of the condition of the engine compartment insulation pad, condition of the cam feed lines, plug wires, thermostat o-ring and oil pressure switch area, and deck lid shocks. (Technicians hate it when they stick their head into an engine compartment only to be "brained" by a falling deck lid)
Breaking out the tools Your Technician will be going to his/her tool box now to select the needed tools to begin the work on your car. First we'll begin by removing the air cleaner, the a/c compressor from it's mounting pedestal and placing it on the right rear padded portion of the fender cover, the heater blower pipe from the heater blower fan, and the engine fuse panel cover. Next the air flow meter assembly comes out completely. Once these items are removed, an intake manifold retorque takes place. (typically Carrera intakes loosen up over time which creates an intake leak which directly effects fuel mixture) Next the spark plug connectors and upper valve covers are removed and placed out of the way. The alternator belt is now replaced with a new one. We will line the engine up to "Z1" (top dead center #1) and pull the distributor cap and inspect the condition. Most of the time the cap and rotor are replaced at this time. (major service) Car is next raised to mid level. At this point the tire pressures will be checked and adjusted to factory specification and then wheels will be removed. Brake pad condition will be visually looked at and rotor thickness will be measured if pads look thin. The hand brake will be adjusted if needed at this point too. (Car will be raised fully after the prior detail done) Engine oil and gear oil are next on the list to be drained. We will be looking for debris on the drain plug magnets. Lower valve covers come off, clutch is adjusted (models 84-86), At this time the Technician has become very familiar with your car and has been taking notes on other things that may or may not need attention. This is the time where the Technician now communicates back with the Service writer. The revised condition of the car is made and the customer is advised of what is recommended and/or needed at that time.
#1 Your lucky day...woo hoo! Your car needs nothing but a major service Congratulations! You have taken very good care of your car! OR This is not your day...we found the following items that need attention...etc.Continuing with #1. It's your lucky day The car is up, the fluids are out, the valve covers are off, and we have the car in the air. The #1 exhaust valve is very easily accessed now with the car in the air. Valve clearance is .004" using a special feeler gauge. Next, the car is again lowered to waist height where we will adjust the #1 intake valve. (again to .004") After this the crankshaft is rotated clockwise 1/3rd of a turn. This brings the engine to "TDC" #6 (TDC stands for "top dead center" or when the piston is at it's utmost top with both intake and exhaust valves closed fully) We will then adjust the #6 intake and exhaust to the .004" spec. The firing order of the Porsche flat six motor is 1-6-2-4-3-5. The valve adjustment is done respective to firing order, each time turning the crankshaft 1/3rd turn clockwise. The next step is to bring the valve covers and oil cooler "S" hose to the "Aqueous" parts cleaning tank. (We used to use a "solvent" tank but now due to the new laws in place in California we are expected to take the grunge and grime off of the covers with soap and water heated to 125 degrees. SORRY it doesn't work! We might as well stand back and scream harsh language at the dirt to "get off thee auto part you ^&%*^%#)*!!! Sorry where were we? Oh yeah, after four times the normal cleaning time for your valve covers and "S" hose...they are clean. Time to bolt them back on using new gaskets, aluminum sealing washers, and nyloc nuts. Install "S" hose. Time to refill the gearbox with oil. Next the spark plugs are removed. You may be wondering why the plugs were not removed before the valve adjustment was done??? There is a good reason for this. The plugs are left in place until after the adjustment is done to prevent a piece of carbon or dirt from the spark plug from getting between the valve seat and the valve face. Thus giving a false reading for the valve adjustment. Time to start putting back all the items we took off in the beginning back on. A new a/c belt is installed at this time. The belt tension is checked with a special gauge. Oil is now added. Typically Carreras take about 10.5-11 quarts of oil. We do not add the entire amount at this point. (Usually 10 quarts) Okay, your wheels are off still so it's time to bleed the brakes (84-86 models) and hydraulic clutch (87-89 models). We use a power bleeder for this. Approximately 15-20 psi. is put on the reservoir to do this. We will be flushing one liter of brake fluid through the system or more until fluid flows clear. Before we bolt the wheels back on we will take the "CO" sample plug out of the catalytic convertor. (No sense in burning your hands trying to remove it after the road test) Our typical road test is approximately 5-10 miles. Long enough to get the oil to full operating temperature.
Finishing During the road test we will be looking and listening for anything that had not shown up before. ie. An alignment issue, wheel shimmy, excessive pinging, smoking...etc. A strong acceleration is done once the car is up to temperature. This is the time we are listening for pinging. A lot of the times the cars will let off a death rattle for two or three seconds straight and be blowing out clouds of crud on the hard acceleration. This is pretty normal. It's just clearing it's throat. If it did it every time after that, then we would suspect too low of an octane fuel was used. Okay, we're back to the shop with the car idling on level ground. The oil level is checked with the motor running. Front oil cooler should be hot to the touch. If it's not, it needs to be. We'll say "it's hot". Oil is topped off and making sure oil level gauge agrees with the dipstick. Next the CO sampling machine is inserted into the port that we removed the cap from prior to the road test. Oxygen sensor disconnected, and a reading taken. Specs should be 0.8% +or-0.2%. If out of range an adjustment is made on the airflow meter.
Minor details Now we are going to go over the car and tighten all the things that normally loosen up over time. ie. Door strikers, sun visors, outside mirror pivots, wiper arms, door check rods...etc. The door hinges and latches are lubricated. Remember those horrible looking pedal pads and that keylight that didn't work? It's time for those. We also put an extra quart of oil in your front trunk in a sealed bag. Depending the weather and how clean your car was when it came in we'll take the car and get it washed for you. We want to make you happy.
Updating the records and doing the bill We're done with the car and now is the time to write a detailed and legible work order/bill for you. Your service booklet is brought up to date and stamped. A copy of the work order/bill is kept for our records also. Here comes that swinging keylight! Now enjoy your professionally serviced Carrera.
I hope this has been an informative and interesting article. Thanks for visiting.